Tuesday, July 16, 2013

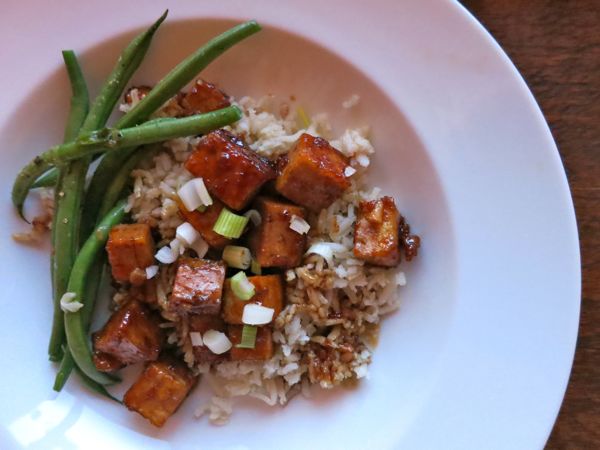
Mongolian Stir-fry


This is one of the dishes that I really enjoyed on our trip to Vermont!
                                                 Mongolian Stir-Fry
1 block extra firm tofu, pressed and cubed
2 tablespoons cornstarch
2 teaspoons sesame oil (or olive oil)
1/2 teaspoon fresh ginger, grated
1 clove garlic, minced
1/2 cup low sodium soy sauce
2 tablespoons rice wine vinegar
1/3 cup brown sugar
1 scallion chopped (for garnish)
fresh lime juice
Heat oil in a skillet over medium-high heat. Add the cornstarch to the tofu in a small bowl and toss to coat.
Add the tofu to the skillet and cook until browned on all sides, about 6 minutes.
While the tofu is cooking, combine the ginger, garlic, soy sauce, vinegar, 1/2 cup water and brown sugar. Mix well.
When tofu has browned, add the sauce, stir, then bring to a simmer before reducing heat to low. Simmer for 5-10 minutes, until sauce has thickened and reduced.
Serve with brown rice, soba noodles, or green beans, and garnish with green onion and a squeeze of lime.

Saturday, July 13, 2013

Crunchy Cashew Thai Quinoa Salad with Ginger Peanut Dressing {vegan, gluten-free}


    Crunchy Cashew Thai Quinoa Salad with Ginger Peanut Dressing 
Ingredients
  • ¾ cup uncooked quinoa
  • 1-2 cups shredded red cabbage, depending on how much crunch you like
  • 1 red bell pepper, diced
  • ½ red onion, diced

  • 1 cup shredded carrots
  • ½ cup chopped cilantro
  • ¼ cup diced green onions
  • ½ cup cashew halves or peanuts (honey-roasted is good)
  • Optional: 1 cup edamame or chickpeas
  • Fresh lime, for a bit of tang
  • For the dressing:
  • ¼ cup all natural peanut butter
  • 2 teaspoons freshly grated ginger
  • 3 tablespoon soy sauce, gluten-free if desired
  • 1 tablespoon honey (use agave if vegan)
  • 1 tablespoon red wine vinegar
  • 1 teaspoon sesame oil
  • 1 teaspoon olive oil
  • Water to thin, if necessary
Instructions
  1. To cook quinoa: Rinse quinoa with cold water in mesh strainer. In a medium saucepan, bring 1 ½ cups of water to a boil. Add in quinoa and bring mixture to a boil. Cover, reduce heat to low and let simmer for 15 minutes or until quinoa has absorbed all of the water. Remove from heat and fluff quinoa with fork; place in large bowl and set aside to cool for about 10 minutes. You should have a little over 2 cups of quinoa.
  2. To make dressing: Add peanut butter and honey or agave to a medium microwave safe bowl; heat in microwave for 20 seconds. Add in ginger, soy sauce, vinegar, and both sesame and olive oil and stir until mixture is smooth and creamy. If you want a thinner dressing, simply stir in a teaspoon or two of water or olive oil.
  3. Add as much or as little dressing as you’d like to the quinoa. I always start out with a little bit of dressing and usually add more to suit my taste preferences. Alternatively you can save the dressing for later and add when you are ready to eat; however the flavors of the dressing usually soak into the salad so I love adding it to the quinoa first.
  4. Next fold in red pepper, onion, cabbage, carrots, and cilantro into the quinoa. Garnish with cashews and green onions. Serve chilled or at room temperature with lime wedges if desired.


Vermont 2013

       Recently my family went on a road trip to Michigan and then Vermont. We started the trip by driving to Grand Rapids, Michigan where we joined our grandparents for Michigan State's Grandparent University. After that, we drove 19 hours to Vermont. The driving was long but we made it fun by caravaning with our grandparents and our aunts's family. We started driving at 7:00 a.m. and arrived in Vermont at 12:00 p.m.  
      Once in Vermont we met up with my dad's brother's family. Their house is located on top of a mountain - it is an amazing setting. If you walk up the drive way you can get a spectacular view of all of these mountains including the biggest in it's area, The Killington Mountains. Killington is also the best downhill skiing and snowboarding mountain in the area. Wherever we went we were surrounded by mountains. The driving can be challenging and also quite scenic as they twist and turn through the countryside.
     Now the best thing to talk about: The Food. We made some very good meals at the house and also went out for a few of the meals. One included going to The Long Trail Brewing Pub (I will include the link to Long Trail Brewing Company further on in the post).  Long Trail Brewing is a Company that Brews beers. When you go to the restaurant you can take a self guided tour of the brewery. When I was there I got to see the Pumpkin Ale being put in bottles and then in boxes. It was pretty cool to see. 
     The first morning we were in Vermont we went to Blanche and Bills Pancake House. (I will include the link to Blanche and Bills Pancake House later on in the post).  Going to Blanche and Bills on the first morning of our stay was a perfect way to kick off our stay in Vermont. At Blanche and Bills I had a breakfast sandwich that included bacon, cheddar cheese, and an egg. All of those goodies were sandwiched in-between an english muffin. Blanche and Bills was devastated when hurricane Irene hit. The restaurant re-opened this year on June 14.
      Some of the meals that we had at home included: Crunchy Cashew Thai Quinoa Salad with Ginger Peanut Dressing, Grilled Pizzas topped with sausage, fresh mozzarella, and basil, and a Soba noodle salad with pan fried tofu. One other item that was a big hit for the kiddies was the fresh watermelon juice. To make watermelon juice all you do is put some seedless watermelon in a blender, once the watermelon is blended squeeze some lemon juice into the blended watermelon, and finally blend the two ingredients for about 25 seconds. I will include the recipes for the Crunchy Cashew Thai Quinoa Salad with Ginger Peanut Dressing and Soba Noodle salad with pan fried tofu in different posts.
       On one of the last days of our stay in Vermont we went to the home of King Arthur Flour (I will add the link to King Arthur Flour later on in the post). The building had a gift store that has anything you might need for any kind of baking. The store also sells merchandise and King Arthur Flour in all different sizes. It also just happened to be lunch time. Their was a nice little cafe in the building where we got lunch. All of the breads on the menu are breads made with King Arthur Flour.
     Our trip to Vermont this year was spectacular. What made the memories were the places we went and the activities we did with our family. 

Links
Long Trail Brewing- http://www.longtrail.com
Blanche and Bills Pancake House- http://www.blancheandbills.com
King Arthur Flours- http://www.kingarthurflour.com


Sausage, Basil, and fresh Mozzarella Pizza before
grilling


This is 4th of July spirit at King Arthur Flour


My uncle and me grilling Pizzas
Piet sitting in King Arthur's Throne 

Sunday, June 16, 2013

Fathers Day 2013

The Delicious Fritata 
   Of Course today is a very very special day to celebrate our Dads. For our celebration of our Father, we made a Bacon Frittata. A Frittata is an egg dish that can be made with meat or it can be a vegatarian dish. You can also add a variety of different herbs to the Frittata to produce some very wonderful bites. On the side of the Frittata we had a fruit plate consisting of red grapes and strawberries. Also on the side we had a plate of different kinds of pastries from Lucia's bakery in Uptown, Minneapolis. This meal was really good. To cap it off my dad, brother, and I had a glass of orange juice. 
     The recipe for the Frittata is further on in this post. We made a couple of modifications to the recipe. One was that we did not incorporate the potatoes and second was we used Gouda cheese in place Provolone. One thing that I love to do for my Dad, to show him how much I love him, is to cook a special meal for him. 

                     Bacon and Potato Frittata


yield: Makes 4 servings
active time: 35 minutes
total time: 35 minutes

8 large eggs

  • 2 tablespoons chopped fresh basil, parsley, or tarragon
  • 3 tablespoons grated parmesan
  • Salt and freshly ground black pepper
  • 6 slices bacon, chopped
  • 1 pound potatoes, peeled and cut into 1/2-inch pieces
  • 2 tablespoons olive oil, divided
  • 1 small onion, or more to taste, chopped
  • 2 garlic cloves, or more to taste, chopped
  • 2 to 3 cups spinach or arugula, coarsely chopped
  • 1/2 cup chopped roasted peppers, or to taste
  • 3 ounces sliced Provolone (5 to 6 slices), optional

  • Special equipment: 10-inch heavy ovenproof skillet, preferably nonstick or cast-iron; heat-proof rubber spatula
print a shopping list for this recipe

preparation

Preheat broiler.
Whisk together eggs, basil, parmesan, 1/4 teaspoon salt, and 1/4 teaspoon pepper in a large bowl.
Cook bacon in a 10-inch heavy skillet over medium heat, stirring, until crisp. Transfer bacon with a slotted spoon to a large bowl then pour off all but 2 tablespoons fat.
Add potatoes and 1/4 teaspoon each of salt and pepper to skillet, and sauté over medium-high heat until golden, about 3 minutes. Cover skillet and continue to cook over medium-low heat, stirring a few times, until potatoes are just tender, about 3 minutes more. Transfer the potatoes with a slotted spoon to bowl containing the bacon.
Add 1 tablespoon oil to skillet and sauté onion and garlic over medium-high heat until pale golden, about 4 minutes, then add spinach and sauté until just wilted.
Gently add the potatoes and bacon, the roasted peppers, and remaining tablespoon oil into onion mixture, spreading it evenly.
Pour egg mixture evenly over vegetables and cook over medium-high heat, lifting up cooked egg around edges with a heat-proof rubber spatula to let uncooked egg flow underneath, 2 to 3 minutes. Reduce heat to medium and cook, covered, until it appears mostly set, with a moist top and center, 3 to 5 minutes more.
Remove lid. If using Provolone, broil frittata 5 to 7 inches from heat until set, but not browned, 1 to 2 minutes, then top with an even layer of cheese and continue to broil until browned and bubbling, 1 to 3 minutes (watch carefully).
If skipping the cheese, broil frittata until the top is lightly browned, 1 to 3 minutes (making sure it doesn't burn).
If using a nonstick skillet, slide the frittata onto a serving plate. If using a cast-iron skillet, cut and serve wedges directly from the skillet.

Wednesday, June 12, 2013

Spring 2013

           I am so sorry that I haven't been posting  on my blog that much lately. School just ended and I have been trying to get into the summer life mood. During school I was really busy which prevented me from posting on my blog. Thank you for your patience and still wanting to follow my blog. I really appreciate it.
          The State of Minnesota has had a very wet spring. Almost every day we have had at least a small sprinkle of rain or a slight shower. The ground in Minnesota is very wet. Many people and farmers have been effected by this very wet spring. Our CSA farmer has his season delayed about 5 weeks because the ground is so wet. All of the rain has been flooding his land. Most of the vegetables he his growing today are in the green house or in a plant tunnel. The rain has helped our own family's prairie garden start to grow and get full. The good thing is that last year at this time we were in a very severe drought. Tons of rain is better than being in a severe drought for half of the summer. With the drought almost all 10,000 lakes that are in Minnesota were reaching record low water levels. The rain has helped replenish those lakes to where they are as full as can be.
          This summer I am hoping to post more frequently on my blog. I want to post more about the meals our family makes and good healthy summer recipes that you can try. I want to post more grilling recipes - focusing on a variety of meat options. I have become a really good griller. A lot of times people will ask me "What is your favorite meat to grill"? I like to grill a variety of meat. I like to use a different rub or marinade depending on what type of meat I am grilling
. I have even considered entering different grilling contests. If I  do you will definitely see a post on my blog about the contest and my experience.
           

Saturday, April 13, 2013

First time Grilling a meal 2013

Recently we had some friends over for dinner on a brisk spring night. We had the idea that maybe since spring had just come we could take our grill out of it's hibernation spot (the garage) and fire it up for the first time in 2013.

We went to our good old friends at Clancey's Meat and Fish market to help us pick something out for this very exciting night. In the end we came home with 3 very beautiful  looking Ribeye's. My dad treated these cuts of steak with a Rosemary, Olive Oil, and Garlic rub. This rub is the one that you can use on any type of meat that you want to grill. The rub brings out an incredible flavor in the meat.

With the meal my mom made this wonderful Parmesan Bread Pudding. It was full of wonderful tastes that combined great with the Ribeye Steak. With the Parmesan Bread Pudding we served  a Caprese Salad which made it feel like Spring outside even though it was 35 degrees and overcast. A Caprese Salad if you don't already know (I would be very surprised if you don't know) is Tomato, Basil, Mozzarella, Salt and Pepper to Taste, and a drizzle of Balsamic and Olive Oil . Further on in the post you will see the recipe for the Parmesan Bread Pudding and the Caprese Salad.

It was nice to finally take the grill out again. Here in Minnesota the word Spring and what we think of it has not hit us yet. We have half an inch of snow on the ground. When we were grilling all we had were brown gardens and black snow surrounding us. People living here in Minnesota are not the only ones that feel the pain. Up north near Lake Superior they get the treat of April Gales and snow blizzards. A Gale is a marine term for a vicious storm.

I am really getting excited to be posting more on my blog. It has been really hard for me to keep up with posting this year  since I have started my first year of Junior High. Once school ends I am hoping to post something every week since I will have the time during the summer.

The Caprese Salad


The Bread Pudding


yield: Makes 4 to 6 servings
active time: 15 minutes
total time: 1 hour

Parmesan Bread Pudding with Broccoli Rabe and Pancetta
1 tablespoon olive oil
2 garlic cloves, thinly sliced
1/2 teaspoon crushed red pepper flakes
1 medium bunch broccoli rabe (rapini), trimmed, cut into 1/2" pieces
2 teaspoons kosher salt plus more
1/2 teaspoon freshly ground black pepper plus more
6 large eggs
1 1/2 cups whole milk
1/2 pound country-style white bread, cut into 1" pieces (about 8 cups)
1/2 cup plus 2 tablespoons finely grated Parmesan
6 thin slices pancetta (Italian bacon)

Preheat oven to 350°F. Heat oil in a large skillet over medium heat. Add garlic and red pepper flakes. Stir until garlic is softened, about 30 seconds. Add broccoli rabe; season with salt and pepper. Cook, tossing, until wilted, about 2 minutes; let cool slightly.

Meanwhile, whisk eggs, milk, 2 teaspoons salt, and 1/2 teaspoon pepper in a large bowl to blend. Add broccoli rabe mixture, bread, and 1/2 cup Parmesan; toss to combine. Transfer to a 1 1/2-quart baking dish. Top with pancetta and remaining 2 tablespoons Parmesan.

Bake pudding until puffed, browned in spots, and set in the center, 45-55 minutes.
________________________________________________________________________


Stacked Caprese Salad

  • Serves 4
  • Prep time: 10 minutes
  • 2 large balls fresh mozzarella
  • Salt and pepper
  • 2 large tomatoes, such as red brandywine
  • 12 leaves fresh basil
  • Olive oil, for drizzling
  1. Evenly cut each tomato and mozzarella ball into six thick slices. Lightly salt one slice of mozzarella, and stack a tomato slice on top. Lightly salt it, then stack a basil leaf on top of that. Continue stacking until you have used 3 slices each of mozzarella and tomato and 3 basil leaves. Drizzle with a little olive oil and season with salt and pepper. Repeat with the remaining ingredients to make four stacks.


Thursday, February 21, 2013

Blood Orange Upside-Down Cake


A close up of the Cake

The cake with the dressed table


Recently my parents hosted their monthly neighborhood supper club. It was a cold  Saturday in February and while I was skating on Lake of the Isles, my parents were cooking up a storm. Part of that efforts included my dad's famous pork roast. My mom decided to make something new - which was a Blood Orange Upside-Down Cake. I tried it and it was mouth watering. What made this cake a hint better was a scoop of vanilla ice cream. It was a perfect winter dessert The blood oranges makes the cake have a tropical taste, which is a treat to have during a cold Minnesota winter. She found the recipe
as she discovered a  blog she had not read before. It is called The Bojon Gourmet. You should check it out and tell me what you think. I really like how she lays out the steps of her recipes in her amazing photographs. I am so excited to make more recipe's from this women's food blog.
In the winter time if you are missing the red hot summer sun, one idea is to just make this cake because when it is all done the top looks like that red hot summer sun.

The link to the blog is: http://www.bojongourmet.com
This link will bring you to the main page of the
blog

To see even more beautiful pictures of the cake
visit this link: http://www.bojongourmet.com/2012/02/blood-orange-upside-down-cake.html

Makes one 9" cake, 8-10 servings

The topping:
3 tablespoons (1 1/2 ounces) unsalted butter, in a few pieces
1/2 cup (3 1/2 ounces) soft light-brown sugar
1 1/2 pounds blood oranges (about 5 medium)

The cake:
4 ounces (1/2 cup) unsalted butter, softened to room temperature
2/3 cup (5 1/4 ounces) granulated sugar
1 1/2 teaspoons finely grated zest from 1-2 blood oranges or tangerines.
1 tablespoon finely grated fresh ginger root (from 3/4 ounce ginger, peeled)

2 eggs, at room temperature

1 1/2 cups (7 1/2 ounces) all-purpose flour
1 1/2 teaspoons baking powder
1/4 teaspoon fine sea salt

1/4 cup plus 2 tablespoons (3 ounces) crème fraîche
2 tablespoons (1 ounce) blood orange juice
1 teaspoon vanilla extract

Make the topping:
Position a rack in the center of your oven and preheat to 350º.

As the oven preheats, place the butter in a 9" round cake pan and put it in the oven to melt. Sprinkle the brown sugar evenly over the butter and return the pan to the oven for about 5 minutes until the sugar is moistened and distributed evenly over the bottom of the pan.

Meanwhile, use a sharp paring knife to slice the top and bottom from the blood oranges. Place a cut-side down, and, following the curve of the orange, cut away the peel and white pith. Cut the orange cross-wise into 3/8" rounds. Repeat with the remaining oranges. Reserve any juices to use in the cake (I like to squeeze the butts and peels to get every last bit of juice).

Lay the orange rounds over the buttery sugar in the pan in a single layer using the fattest pieces and starting with the outer ring, and filling in the center with the smaller pieces. Set aside while you make the cake batter.

Make the cake batter:
In the bowl of a stand mixer fitted with the paddle attachment, cream together the butter, sugar, zest and ginger until fluffy and lightened in color, about 5 minutes on medium speed, scraping down the sides of the bowl occasionally. Add the eggs one at a time, beating after each addition until incorporated, scraping down the sides of the bowl as needed.

Sift the flour, baking powder and salt into a medium bowl.

In a measuring cup, stir together the crème fraîche, blood orange juice and vanilla extract.

With the mixer on low, add 1/3 of the dry ingredients to the butter mixture, let stir to incorporate, then scrape down the sides of the bowl. Add half of the crème fraîche mixture, let incorporate, then scrape. Repeat, adding another 1/3 of the dries, half of the crème fraîche, and the rest of the dries. Remove the bowl from the mixer and fold the batter with a rubber spatula to make sure the batter is completely homogeneous.

Dollop the batter over the orange slices, which may have released some juices and that's a-ok, and spread it evenly.

Bake the cake until a toothpick inserted in the center comes out clean, 35-45 minutes. Let the cake cool for 10 minutes. (If the cake cools too much, the orange goo may stick the pan; no worries, just return the cake to a hot oven for 5 minutes or so to re-melt it.)

Loosen the edges of the cake with a thin knife or offset spatula, invert a large plate over the top of the cake. Wearing oven mitts, grasp the cake and plate together and bravely flip them both over. Rap the plate on the counter a few times to dislodge, then remove the cake pan. Let cool to room temperature, about 1 hour – the cake is still baking from residual heat, so try to resist cutting into it too soon.

For the cleanest slices, use a serrated bread knife to gently saw through the orange slices, which can be a bit messy. Serve slices with extra crème fraîche, or crème anglaise (see headnote).

The cake is best served shortly after cooling, but will keep for up to 3 days at room temperature.